Troubleshooting for interlining adhesive presses
Troubleshooting for interlining adhesive presses
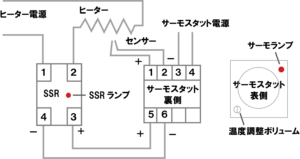
The above figure shows the basic circuit around the heater of an adhesive press machine. Real machines have 4, 6, or 9 heaters.
As the number of heaters increases, the number of SSRs (solid-state relays that turn the heaters on and off) also increases, but the basic configuration and function are the same.
When the temperature of the heater is rising, the thermostat checks the temperature of the heater through the sensor.
When the temperature has not reached the thermostat’s setpoint, 5-20 VDC flows from (5) and (6) of the thermostat to (3) and (4) of the SSR.
At that time, the thermo lamp on the front side of the thermostat and the SSR lamp on the SSR are on. While DC current flows through (3) and (4) of the SSR, current flows between (1) and (2) of the SSR.
In other words, the voltage between (1) and (2) is 0V. (The voltage between (1) and (2) is 0V because the current is flowing inside (1) and (2).)
The heater has a sensor, and when the temperature rises too high, the DC current between thermostats (5) and (6) goes to 0V, and between SSRs (3) and (4) also goes to 0V.
At this time, a voltage is applied between SSRs (1) and (2).
This voltage varies depending on the specifications, but for domestic specifications, it is 100 V or 200 V.
For overseas specifications, the voltage is 220V or 380V.
At this time, the thermo lamp on the front side of the thermostat and the SSR lamp on the SSR are off.
Thermostat does not work.
First, check the power supply.
The thermostat’s input power supply is either 100 VAC or 200 VAC, depending on the model.
Check the input voltage of the thermostat with a tester.
Once the input voltage is confirmed, check the output voltage. Check to see if the thermostat output voltage of 5-20 VDC is being output.
If there is no input voltage to the thermostat, it will not operate even if the thermostat itself is not faulty.
The actual temperature does not rise relative to the temperature setting.
Check if the thermostat is outputting a signal to the SSR.
After checking the input voltage of the thermostat, check if the thermostat output voltage of 5-20 VDC is being output.
Check the operation of the SSR. Set the thermostat at 130° C. Measure the voltage between SSR’s #1 and #2. If the voltage is 0 V, electricity should be flowing to the heater. If the temperature still does not rise, the heater is defective. If there are multiple heaters, several of them may be out. To check for broken heaters, use a tester to check the continuity of one heater at a time.
The actual temperature is abnormally high relative to the set temperature
Defective temperature sensor.
Defective SSR.
The heater with the temperature sensor is out.
How to match actual temperature and temperature setting
Check the actual temperature of the press using thermo paper.
(e.g.) When the temperature setting is 130°C and the temperature indicated on the thermo paper is 140°C, this means that the actual temperature is 10°C higher than the setting.
For analog thermostats
Adjust the thermostat temperature setting to 140 degrees. Turn the temperature compensation dial on the thermostat so that the other lamp also blinks at the set temperature of 140 degrees.
Now the actual temperature is 140 degrees Celsius compared to the set temperature of 140 degrees Celsius. Adjust the temperature setting to 130°C. Wait until the thermo lamp blinks at 130°C.
For digital thermostats
First, turn off the machine.
Loosen the take-out on the front of the thermostat and pull out the contents of the thermostat. There is a DIP switch inside, DIP switch No. 4 is usually in the OFF position, turn the No. 4 switch to the ON position. Do not touch any other switches.
Place the thermostat in the case again and turn on the power; operate the FUNCTION key and when Cn5 is displayed on the meter that normally shows the set temperature, the temperature compensation is ready.
Interlining adhesion press trouble, causes, and countermeasures
| PHENOMENON | CAUSE | COUNTER-MEASURE |
| GAP BETWEEN MATERIAL & ADHESIVE INTERLINING |
|
|
| SEEPAGE OF RESIN |
|
|
| CONTRACTION |
|
|
| LOSE LUSTER. DISCOLORATION. |
|
|
| SHINE |
※When the gloss is lost due to the aforementioned action, dry-heat ironing may be used to restore the gloss. |
|
| PEELING ADHESION FAILURE |
|
|
FOLLOW US